What is the 3 Day Refresh??

3 day refresh before after 3day detox clease beachbody cleanse three

You may have heard me talk about the Shakeology Cleanse before – it’s a great way to drop around 5 pounds in three days, following a mostly liquid diet, and you can read more about it here.  But as great as the results from the Shakeology Cleanse were, it wasn’t an ideal way to clean out your body and really detox.  Shakeology is an awesome product, but that isn’t what it was designed for.

Luckily for us, Beachbody saw what we were doing and knew we needed a better solution.  A healthy way to detox your body quickly, to safely lose weight, and even to jumpstart your weight loss results from one of our other awesome programs like the 21 Day Fix.  And so they created the 3 Day Refresh.

http://beachbodycoach.com/esuite/home/coachamyallen?bctid=3591210905001

I have done cleanses before, and they are hard.  But one of the things I love about this cleanse is that it isn’t strictly liquids.  It includes the best of every detox program I have heard from – Shakeology, tea, juice, clean eating, and supplements and it combines them all into an easy to follow program for three days that delivers amazing results.

I am in pretty good shape.  For the most part I eat clean and stay away from processed foods.  And because of that, I didn’t expect amazing results.  But what happened for me BLEW. ME. AWAY.

But before I share my results with you, let me tell you a little bit about how the refresh works.

3 day refresh meal plan

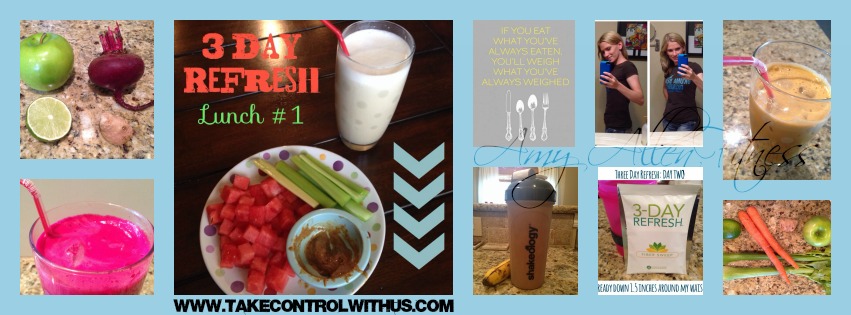
Each day, you wake up and get started with a cup of water followed by Shakeology.  You can add in fruit or eat it on the side.  Mid morning, you can have a cup of tea and you drink Fiber Sweep, a supplement designed to gently clean out your insides.

For lunch, you drink Vanilla Fresh, a specially designed protein drink with more protein than Shakeology and vitamins specifically geared to sustain your body during the cleanse.  You also get to have a veggie serving and a healthy fat.  Mid afternoon, you can drink another cup of tea along with an afternoon snack, another veggie or a fresh juice – I chose the juice option and it was the perfect amount of sweet to keep me going.

For dinner, it’s another shake along with a dinner option – a little more than just veggies – and you can accompany that with veggie broth if you need just a little more.  Post dinner, you have the option of one more cup of tea.

Each day you follow the same routine, but since there are multiple food options, you can change it up some what.  I made a video diary of each day I followed the refresh, how I felt, what I ate, and what I did.  Here are the videos –

If you are curious about exactly what comes in your kit, check out this video where I show you exactly what you get.

Exercise is optional during the three days.  By the end of three days, I felt great but there were times when I felt weak, so listen to your body.  My results were little to light exercise on two days.

One thing I added to my refresh was a daily detox bath.  I have long believed in detox baths and I thought it would be relaxing and hopefully intensify my results.  Each day I did a different one – I elaborate more on them in the videos, and I also plan to post about that later this week.

3 day refresh results 3day three detox cleanse after before

So after three days, here are my results – I was down three pounds AND I lost THREE INCHES in my waist alone.  My pictures aren’t amazing… but I am not sucking in… coming off a weekend in Vegas, I was pretty bloated from bad food.  But THREE INCHES????  I was in shock.  I measured multiple times because I was sure that I was wrong.  My main waist measurement went from 29.5 inches to 26.5 inches.  In three days.

Screenshot 2014-07-07 18.05.23

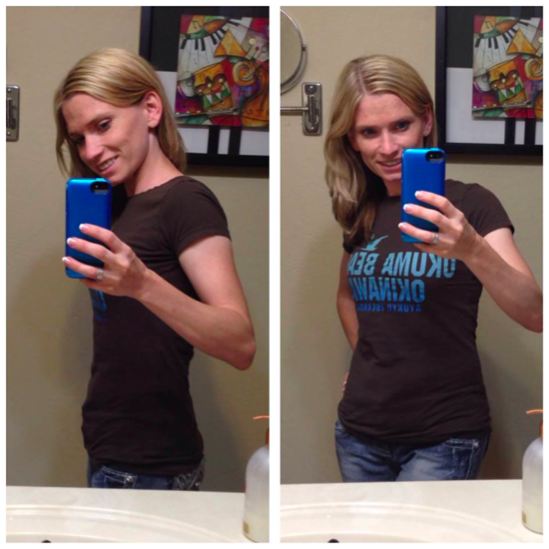
These are my skinny jeans and my skinny top.  The one I never wear because it’s too small… and it fit.  And beyond that, the way I felt?  Amazing.

Want to try it for yourself??  Visit www.getfixedwithAmy.com to order – right now you can get it for just $10 with your Shakeology order and I can’t imagine a better deal than that.


21 Day Fix Asian Salad with Homemade Asian Dressing

21day fix asian salad with vinagrette 21 day

After living in Japan for three years, I love all foods Asian.  It’s the number one thing I miss about living in Asia.  And while the Japanese are pretty healthy as a culture, some of my favorite foods aren’t.  This salad is a great way for me to get my Asia fix with out sacrificing taste!

21 Day Fix Asian Salad (Serves 1)

Container Checklist: 2 green, 1/2 purple, 1 orange

Ingredients:

  • 1 1/4 cup organic butter lettuce
  • 1 cup celery, chopped
  • 3/4 cup pears, peeled and chopped
  • 1/4 cup Green Onions
  • 1 Tbsp mixed seeds (pumpkin and sunflower)
  • 1 Tbsp homemade Asian Vinaigrette (recipe posted below).

Toss first five ingredients then drizzle with vinaigrette. It’s kind of any ugly salad, it’s mostly green, but it sure is tasty!

Asian Vinaigrette (Serves 6)

  • 1/4 cup 100% orange juice
  • 1/4 cup rice vinegar
  • 2 TBSP reduced sodium soy sauce
  • 2 tsp raw honey
  • 1/2 inch fresh ginger,peeled & finely grated
  • 1/4 cup sesame oil

Combine orange juice, vinegar, soy sauce, honey and ginger in a medium bowl. Whisk to blend.  Slowly add oil while whisking, mix well.  Store in refrigerator, covered.  If it thickens when cold, hold it at room temp for 30 minutes and shake well before using.

Amy Allen star diamond coach

21 Day Fix Salad with Homemade Balsamic Dressing

IMG_5852

This has long been my absolute favorite salad recipe, and I’m happy to share that with just a few modifications, I can still eat it during the 21 Day Fix… now it’s a little bit healthier for me (and just as tasty!) and I can enjoy it without any guilt.

21 Day Fix Salad (Serves 1)

Container Checklist: 1 green, 1 blue, 1 orange

Ingredients:

  • 1 cup organic baby spinach
  • ¼ cup organic sprouts (learn how to grow your own here!)
  • 1/8 cup Feta Cheese
  • 1/8 cup toasted chopped pecans
  • 1/8 cup homemade Balsamic Vinaigrette (recipe posted below).

Toss first four ingredients then drizzle with vinaigrette.  For toasted pecans, I like to heat a skillet on the stovetop and just warm the nuts without using any sort of oil or seasoning.


Balsamic Vinaigrette (Serves 8)

  • 6 T Balsamic Vinegar
  • 1/4 cup fresh lemon juice
  • 1 tsp raw honey (or pure maple syrup)
  • 2 tsp Dijon mustard
  • 6 T EVOO

Combine vinegar, lemon juice and honey in a medium bow. Whisk to blend.  Stir in mustard, mix well.  Slowly add oil while whisking, mix well.

Store in a covered container in the refrigerator. If it thickens when cold, hold it at room temp for 30 minutes and shake well before using. It’s amazing on salads but also great drizzled over sautéed veggies, steamed fish, grilled chicken or beef.

Growing your own Organic Sprouts

IMG_5740

For Christmas, my sweet husband bought me a grow your own sprouts kit… Well, actually, I picked it out, told him I wanted it, and he told me to go ahead a buy it for myself, wrap it and put it under the tree… I guess it doesn’t matter how it got there. The bottom line is I love adding fresh sprouts for my salad and now I can grow my own.

There are a great many benefits to eating sprouts.  Experts estimate that there are up to 100 times more enzymes in sprouts than there are in traditional fruits and veggies.  The protein quality is also higher, and the vitamin and fiber content increases substantially over traditional fruits and vegetables.  Sprouts also help to maintain alkalinity in the body.  And while I am not a doctor, I have read studies that indicate broccoli sprouts may be helpful if you are fighting cancer**.

I ordered the kit pictured above from www.seedsnow.com and in retrospect, I didn’t really NEED the kit. I already had most of the items needed around my house aside from the seeds. The kit was handy because it came with everything I needed, but I wasn’t completely happy with my purchase.  It was advertised as non-GMO (true) and organic, but actually only one of the seed packets was organic.

I would recommend ordering just the organic non-gmo sprouts from www.seedsnow.com and sourcing the rest of the materials yourself. It would likely save you money and wouldn’t be too difficult to do. So here is what you will need:

  • Organic, non-gmo sprouting seeds
  • A large mason jar
  • Some sort of mesh to cover the mouth of your jar
  • A towel
  • Water

Step by Step Directions

IMG_5815

Step One:

Measure out sprout seeds. I used small alfalfa sprout seeds, so I used 2 Tbsp of seeds. For larger seeds, like peas, you may need up to ¼ cup.

Step Two:

Put your seeds into the ball jar and cover them with water.  There should be about an inch of water over the top of the seeds.  Screw on the lid with mesh covering attached and allow to sit overnight, 8-12 hours.  Cover the entire jar with a small towel during the entire process (the sprouts should be kept out of the light as much as possible during the process).

IMG_5816

Step Three:

In the morning, drain all of the water off the sprouts and rinse them with fresh water – you can leave them in the jar while you rinse them.  Drain the excess water and turn the jar onto it’s side and shake the jar to spread out the seeds evenly.  They should be damp but there should be no standing water.  Cover with the towel.

IMG_5817

Step Four:

Over the next three to five days, remember to rinse the sprouts 2-3 times per day, and always leave the jar on it’s side, covered with a damp towel.  Again, you can leave the sprouts in the jar to rinse them; just be sure to drain the excess water.  By the fourth or fifth day, your jar should be full of organic sprouts to enjoy any way you choose.  After the fifth day, I did leave mine in the jar, uncovered in the fridge.  I’m not sure what the correct procedure is for storing them but this has worked well for me.

IMG_5853

These organic sprouts are a great addition to any clean eating, organic, non-gmo meal plan.  Enjoy!

**Side note – the American Cancer Society does not recommend sprouts in your diet if you have a weakened immune system such as occurs during chemotherapy.  While there are a great many benefits to eating sprouts, be sure to consult your doctor first if you fall into this category.

Black Beans and Rice

Beans and Rice Ultimate Reset 21 day fix

This is one of my favorite recipes from week 1 of the Ultimate Reset… and luckily for me, with just a few modifications, it fits in perfectly with the container system for the 21 Day Fix!  It’s super easy and quick to make, but also super healthy and extremely flavorful! If you like Mexican food, this is a great healthy substitute.

Black Beans and Rice (Serves 1)

Container checklist:  2 yellow and 1/4 tsp oil

Ingredients:

  • 1/2 cup cooked brown rice
  • 1/2 canned low sodium black beans
  • 1/4 tsp extra virgin olive oil
  • 1/8 tsp chili powder
  • 1 pinch ground cumin
  • 1/4 tsp ground coriander
  • 1 tsp. Bragg liquid Aminos** or (low sodium soy sauce)

While rice is cooking, heat beans gently in saucepan until very hot. Drain and return to pan.  Add oil, spices, aminos, and salt.  Stir well.  Gently fold rice into cooked beans.  Brown rice takes about 45 minutes to cook, so I like to make up a batch in my rice cooker at the beginning of the week so I can have it ready to go during the busier week days.

This is a great stand alone vegetarian meal… but if you are like me and have meat eaters or non fixers in the house, it’s easy to amp it up with some chicken, fresh corn, guacamole – and with tortillas, you can make it a taco night 🙂

**Braggs Amino Acids is a great and healthy soy sauce alternative.  In my house, we don’t buy soy sauce anymore and not even the pickest four year old complains about the taste of Braggs.  You can get it at any health food store or on Amazon here.  Braggs also has a great line of other products that would be “free” foods during the 21 Day Fix, like organic apple cider vinegar and organic sprinkle all purpose seasoning.

Organic Banana Pancakes

Yum Yum!

My husband and kids love pancakes, but I don’t like them at all… and I like making them even less now that we have started eating clean which means this mom doesn’t buy Bisquick anymore! Consequently, we rarely had pancakes until I found this recipe, which is perfect for making pancakes for my kids on a week day. The recipe only makes a few, which is great for a quick and healthy breakfast! And if my very picky eater loves them, they might be worth a try at your house…

Organic Banana Pancakes

  • 1 Organic Banana
  • 1 Organic Egg
  • 1 T. Organic Almond Butter
  • Optional – Chocolate chips

Just mix up the first three ingredients and pour on to a hot griddle. If I’m feeling like a nice mom and we happen to have any in the house, sometimes I’ll sprinkle chocolate chips over the top. Once the first side has browned, flip to other side. Let that side brown, then enjoy!

A hot healthy breakfast in minutes!